Fuel Tanks and our Epic Fuel Tank Lids
The old stainless steel diesel tanks are out. New plastic ones are going in. Simple, right?
Not really…
We sourced stock tanks that were close to the right size, but nothing fit without modification. The spin-off lid that came with the tank? Useless. Every time you unscrew it, any water sitting on top drops straight into your diesel. That’s not happening.
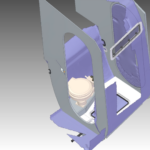
So we built our own filler assembly using:
- Fuel-resistant vinyl ester resin from Easy Composites (specifically formulated for diesel exposure)
- 3D printed TPU gaskets – experimental, but promising for custom sealing
- Custom sender unit adapters because the old tanks were taller and narrower
- Relocated filler from the deck to inside a dedicated locker
Moving the filler inside the locker solves three problems: no water ingress during refueling, less UV damage, and better security against theft or sabotage. Yes, technically this might bend some rules, but the locker has a drain straight overboard, and we’re not the type to click the pump and walk away. We watch every drop.
The new clear tanks mean we can see the diesel level at all times. No more illegal PVC sight glass with hose clamps waiting to fail. That old setup wouldn’t be allowed today anyway – bottom penetrations are a no-go. All our connections now come from the top.
A Hatch Positioned to Move Air
The forward cabin was a problem. Leaks from toe rails, stanchion sockets, and the old hatch made it unpleasant. Worse, it had no airflow.
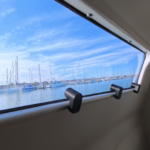
We cut a new side hatch – but positioning it was a battle. Too far forward and it catches waves while sailing. Too far aft and it misses the breeze at anchor. We also had to work around the front box beam for the mast (structural, so no cutting there).
The final position uses the boat’s wedge-shaped hulls to create high pressure at the front of the wing deck when at anchor. That pressure pushes air straight through the hatch. Passive cooling. No fan required.
There was a fight over hatch size. Everyone wanted the big one. We put in the big one. Everyone’s happy.
Saloon Seating: Form vs. Function
The original corner seat was chamfered – looked sleek, felt awkward. You couldn’t actually lean back into it. We ripped it out and rebuilt to a hard 90-degree angle, making the seat wider and longer.
The new seat is carbon laminate with a 600gsm skin (300g double bias + 300g 0/90). It’s crunchy, stiff, and under half the weight of the original plywood – despite being physically larger.
Oliver’s been clear-coating and sanding the carbon ceiling panel in his room. He wants the raw carbon finish visible. Can’t blame him.
Harrison’s Workbench & Recycled Race Boat Parts
Harry’s cabin features lockers from Ericsson 4 (ex-Volvo Ocean Race). He’s building a workbench (sorry, he corrected me – it’s a workbench, not a desk) using recycled carbon panels from the Alinghi 5 America’s Cup boat. The one that got smashed up by a digger with a hydraulic jaw. He still has PTSD about that.
Under the workbench goes an escape hatch. If the boat ever flips, that hatch is how we get out. The workbench top will be removable – we’re not trapping anyone in a capsize situation.
Water Tanks & Safety
Old stainless water tanks are out. Twin plastic tanks are going in. Why two?
- Redundancy: If one tank fails or gets contaminated, we have backup water.
- No bottom penetrations: All fittings come from the top. No illegal sight glasses.
- Gravity-fed separation: The connection between tanks is high up, so a leak in one won’t drain the other.
Of course, nothing sits flat. The wing deck slopes, so we built custom shelves with dog bone tie-downs and webbing straps. Every tank gets secured properly. Every shelf gets tailored hard points.
More on our Refit
- Portside Upgrades and Our Epic Diesel Tank Lid
 Fuel Tanks and our Epic Fuel Tank Lids The old stainless steel diesel tanks are out. New plastic ones are going in. Simple, right? Not really… We sourced stock tanks that were close to the right size, but nothing fit without modification. The spin-off lid that came with the tank? Useless. Every time you unscrew it, any… Read more: Portside Upgrades and Our Epic Diesel Tank Lid
 - From America’s Cup Trash to Boat-Building Treasure: Our Paikea Refit Update
 It’s been a long haul of late nights and tired eyes, but we’re finally at a stage where we can step back and say, “Okay, we’re getting there,” rather than, “Oh, s#%t, what have we done?” Welcome back to the mess that is Paikea. In our latest update, we’re walking you through the big milestones… Read more: From America’s Cup Trash to Boat-Building Treasure: Our Paikea Refit Update
 - Solving Boat Shower Drainage with Cardboard, CAD, 3D Scanning & 3D Printing
 The Hybrid Design Workflow: Building a Boat Shower Floor with Cardboard, CAD, and 3D Scanning: Walk through the hybrid design process for a custom boat shower floor. See how cardboard prototyping, CAD, 3D scanning, and 3D printing combine to solve complex drainage and access problems in a marine refit. Author: Shayne and Anna Introduction Designing… Read more: Solving Boat Shower Drainage with Cardboard, CAD, 3D Scanning & 3D Printing
 - The Boat Shower Floor Blueprint: Drainage, Hatches & Avoiding Bilge Floods
 When your floor needs to drain, provide access, and never flood the bilge. A deep dive into the logic behind our custom shower hatch. Key Topic: Join Shayne & Anna in the bilges for a marine design deep-dive. We’re solving the boat shower’s trickiest puzzle: creating a floor that drains properly, includes mandatory access hatches,… Read more: The Boat Shower Floor Blueprint: Drainage, Hatches & Avoiding Bilge Floods
 - Boat Hatch Build: Installing Lenses & Drains for a Watertight Finish
 Key Topic: After months of building custom composite hatches, we reach the transformative stage: making them watertight and bringing in light. This hands-on guide walks you through our exact process of installing thick acrylic lenses, designing effective 3D-printed drainage, and using the right sealant for a perfect, professional bond. See the step-by-step techniques that turn… Read more: Boat Hatch Build: Installing Lenses & Drains for a Watertight Finish