Author: Shayne and Anna
Key Topic: Properly tuning your multihull’s rigging is a critical follow-up after replacing standing rigging. This guide breaks down the step-by-step process used by professionals to achieve a straight mast, correct pre-bend, and balanced tension, transforming a basic rig replacement into an optimized sailing system for both performance and safety.
You’ve invested in new standing rigging and put some sailing miles on it – now comes the crucial part: the fine-tuning. Proper rig tuning is what transforms a basic rig replacement into a optimized sailing system. In this guide, we’ll walk through the exact process we used on a Belize 43 catamaran to dial in their rig after cruising the Caribbean.
The Fundamentals: What You’re Trying to Achieve
Before touching any turnbuckles, understand these three key objectives:
1. A Straight Mast (Side-to-Side)
Looking up the mast track, you want a straight line from base to masthead. Any curves indicate uneven tension in your diamond wires or shrouds.
2. Proper Pre-bend (Fore-and-Aft)
The mast should have a gentle curve forward between spreaders – typically 1-2% of the mast length. For a 15-meter mast, that’s 150-300mm of bend.
3. Balanced Rig Tension
The rig should be tight enough to prevent excessive movement but soft enough to avoid over-stressing the boat structure.
Step-by-Step Tuning Process
Step 1: Assess Mast Alignment
Start by looking up the back of your mast track. “If we look at the track on this particular one,” we observed, “we can actually see they’ve been on one tack for a while… the bottom panel has a bit of a curve to starboard.”
What to look for:
- Curves between spreader sections
- Overall lean to one side
- Consistency of the bend pattern
Step 2: Correct Mast Bend with Diamond Wires
To straighten a mast that’s bending to starboard, you need to tighten the port diamond wire. This pushes the spreader against the mast, straightening it out.
The process:
- Remove split pins/cotter pins
- Lubricate threads (Tef-Gel or marine grease)
- Use two spanners – one on the turnbuckle, one on the wire to prevent rotation
- Make small adjustments (½ to 2 turns)
- Re-check alignment after each adjustment
Step 3: Set Pre-bend
Use a simple control line tied from the masthead to the base to measure pre-bend. “We want two percent of the length from here to the masthead,” which translates to 1-2% of your mast length.
Key points:
- Maximum bend should be between spreaders
- Account for the offset of your measuring line
- Adjust using forward diamond wires
Step 4: Tune the Front Beam & Martingale
Many multihull owners overlook this critical adjustment. The martingale wire (running from beam to forestay) should put slight downward pre-bend in your front beam.
What to look for:
- 5mm or less of downward bend in the beam
- Tight enough to lock the front end rigid
- Adjust with turnbuckles at beam ends
“If this is really tight and you can’t turn it,” you may need to “ease the side stays to take the rig tension off the forestay.”
Step 5: Check Overall Rig Tension
The gold standard for multihulls: when sailing upwind fully powered up, your leeward shroud should just go loose as the boat goes through waves.
Sweet spot indicators:
- Leeward shroud goes slightly loose in 15+ knots (12+ for performance multis)
- Rig isn’t bouncing excessively
- Boat isn’t being folded in half by overtight rigging
Step 6: Verify Mast Rake
Check your mast base. “If the base of the mast is actually sitting really flat on the mast step itself, that’s a pretty good indication that the rake is correct.”
Troubleshooting rake:
- Gap at front = too much rake (shorten forestay)
- Gap at back = not enough rake (lengthen forestay)
- Mast butt should sit flat when properly raked
When to Re-tune
Even after proper initial tuning, expect to make adjustments after:
- 200+ miles of sailing
- Seasonal temperature changes
- After heavy weather sailing
- Annually as part of routine maintenance
Pro Tips for Better Results
Use Multiple Reference Points
While the mast track is convenient, also look at extruded grooves in the mast itself. “The track is only as straight as the guy that bolted it on.”
Work Methodically
Make small adjustments and re-check frequently. It’s easier to add tension than remove it.
Consider Your Sailing Style
Cruising boats can run slightly softer rigs than performance-oriented vessels. Adjust based on how you use your boat.
Conclusion: Tuning is an Ongoing Process
Rig tuning isn’t a set-and-forget operation. As one experienced owner noted, “they’ve probably got another 200 miles of sailing and they’ll have to have a look at this again.” Regular checks and minor adjustments will keep your multihull sailing efficiently and safely for years to come.
The goal isn’t perfection but understanding – knowing what to look for and how to make the small adjustments that make big differences in your boat’s performance and longevity.
Continue your rigging deep dive:
- The Art and Science of the Self-Tacking Jib: Why It’s More Complicated Than You Think
 Author: Shayne and Anna Introduction If you’ve ever spent a long day on the water tacking up a tight channel, you know the appeal of a self-tacking jib. The promise is simple: ease, simplicity, and the ability to short-hand the boat without a grinders’ pit crew on the rail. But as with anything in sailing,… Read more: The Art and Science of the Self-Tacking Jib: Why It’s More Complicated Than You Think
 - Laminating Stanchion Sockets & The Truth About Peel PlyKey Message: A successful composite lamination is defined by understanding the loads, mastering the process, and knowing the hidden details—like why you must always sand a peel ply surface before secondary bonding. Author: Shayne and Anna Introduction In the sweltering 32°C heat of the boat shed, we’re finishing the final staunchion socket on Paikea’s starboard side.… Read more: Laminating Stanchion Sockets & The Truth About Peel Ply
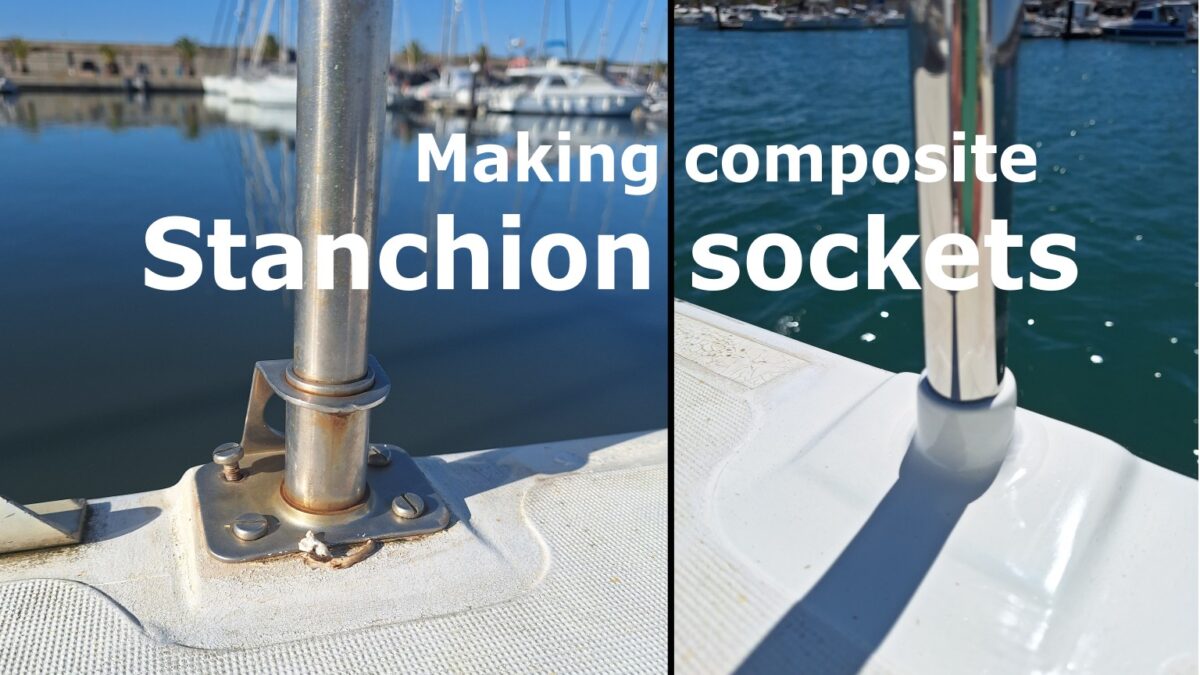
- Making Composite Stanchion Sockets: An Engineering Approach to Safety & Aesthetics
 Key Message: A successful upgrade to a critical safety system requires understanding not just how to build it, but why you choose specific materials and processes. The goal is a solution that is stronger, cleaner, and fails in a predictable, safe manner. Author: Shayne and Anna Introduction The original stainless steel stanchion bases on Paikea were functional but… Read more: Making Composite Stanchion Sockets: An Engineering Approach to Safety & Aesthetics
 - Staunchion Sockets: A Masterclass in Material Selection and Failure ModesKey Message: Choosing materials isn’t about what’s “strongest,” but about how they handle loads and, just as importantly, how they fail. A pultruded carbon spiggot might seem high-tech, but its failure mode makes it a dangerously poor choice for a lifeline system. Author: Shayne and Anna Introduction In our first post, we covered the hands-on process… Read more: Staunchion Sockets: A Masterclass in Material Selection and Failure Modes
- How to Tune Your Multihull Rigging: A Complete Step-by-Step GuideAuthor: Shayne and Anna Key Topic: Properly tuning your multihull’s rigging is a critical follow-up after replacing standing rigging. This guide breaks down the step-by-step process used by professionals to achieve a straight mast, correct pre-bend, and balanced tension, transforming a basic rig replacement into an optimized sailing system for both performance and safety. You’ve invested… Read more: How to Tune Your Multihull Rigging: A Complete Step-by-Step Guide