Author: Shayne and Anna
Key Message: By replacing a heavy, non-structural plywood floor with a custom composite one, we achieved a monumental 75% weight saving in this area—transforming 30kg of dead weight into an 8kg structural component that actively strengthens the hull.
In boat building, every kilogram saved is a win. So, when we weighed the old, rotting plywood floor in our catamaran’s aft cabin and saw it was 15.23kg for just half the floor, we knew we had a massive opportunity. By replacing it with a custom-built, fibreglass composite floor and hatches, we achieved a staggering 75% weight reduction, turning dead weight into a strong, structural part of the boat.
The Weight Savings: By the Numbers
The results of this upgrade speak for themselves. We moved from a heavy, non-structural timber floor to a lightweight, fully integrated composite system.
The Data:
- Old Half Floor Weight: 15.23 kg (marine plywood with vinyl topping and bracing)
- New Full Floor Weight: 7.84 kg
- Total Weight Savings: Over 22 kg for the complete aft floor area
- Hatch Weight: Under 1 kg each
This means the entire new floor system—a complete floor and multiple hatches—weighs less than half of the original timber floor alone. This kind of weight reduction directly translates to better performance, improved fuel efficiency, and increased payload capacity for supplies.
The Build Process: Lighter and Stronger
The transformation wasn’t just about swapping materials; it was about redesigning the component to be part of the boat’s structure.
From Plywood to Composite:
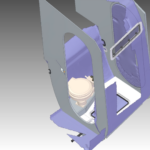
The original floor was heavy plywood that simply sat in place, secured with a few screws. It provided no structural benefit to the hull. Our new floor is vacuum-infused with fibreglass, using a PVC foam core. Once laminated into the hull, it becomes a structural panel, actively contributing to the boat’s overall stiffness and integrity.
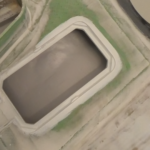
Iterative Hatch Design:
The project was also a lesson in iterative improvement. The first hatch we built was slightly heavier, using 1200g of material on both the top and bottom skins. By the final hatch, we had optimized the process, using a heavier skin on the walking surface (1200g) and a lighter, but still strong, skin on the bottom (700g), all while ensuring it was more than strong enough for a “small elephant” to stand on.
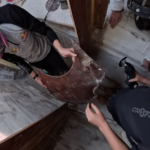
A Family Affair in the Workshop
With rainy weather outside, our boat’s saloon was temporarily converted into a laminating workshop. The project became a family effort, with the kids helping to clean up the newly infused hatches and manage the workspace. This hands-on involvement is a core part of our refit philosophy, turning a massive project into a series of manageable, family-oriented tasks.
Conclusion: A Lighter, Brighter Future
Replacing the aft floor is more than just a cosmetic upgrade; it’s a fundamental improvement to Paikea’s structure and performance. Shedding 22kg of dead weight from one area of the boat is a significant achievement. Combined with the new structural strength and the clean, modern finish, this project represents the very best of what a refit can achieve: a boat that is lighter, stronger, and better suited for the adventures ahead.
Continue following our refit journey:
- Solving Boat Shower Drainage with Cardboard, CAD, 3D Scanning & 3D Printing
 The Hybrid Design Workflow: Building a Boat Shower Floor with Cardboard, CAD, and 3D Scanning: Walk through the hybrid design process for a custom boat shower floor. See how cardboard prototyping, CAD, 3D scanning, and 3D printing combine to solve complex drainage and access problems in a marine refit. Author: Shayne and Anna Introduction Designing… Read more: Solving Boat Shower Drainage with Cardboard, CAD, 3D Scanning & 3D Printing
 - The Boat Shower Floor Blueprint: Drainage, Hatches & Avoiding Bilge FloodsWhen your floor needs to drain, provide access, and never flood the bilge. A deep dive into the logic behind our custom shower hatch. Key Topic: Join Shayne & Anna in the bilges for a marine design deep-dive. We’re solving the boat shower’s trickiest puzzle: creating a floor that drains properly, includes mandatory access hatches,… Read more: The Boat Shower Floor Blueprint: Drainage, Hatches & Avoiding Bilge Floods
- Diagnosing and Repairing Hull Delamination and Core Damage.The Problem: From Floor Installation to Structural Repair Author: Shayne and Anna During the installation of new cabin soles in our Catana 42 refit, a routine task uncovered a significant structural issue. The discovery process is a textbook example of why systematic disassembly is critical. Initial Indicators: The Technical Failure:In a cored composite structure (like… Read more: Diagnosing and Repairing Hull Delamination and Core Damage.
- Re-Engineering a Hull: Load Paths, Daggerboards, and a New Structural BulkheadAuthor: Shayne and Anna Key Message: The most important part of a structural refit is understanding and optimizing load paths. By relocating a bulkhead to align with the strongest part of the daggerboard foil, we significantly increase Paikea’s structural integrity and sailing performance. Introduction: Identifying a Structural Flaw During Paikea’s refit, we noticed a discrepancy. On… Read more: Re-Engineering a Hull: Load Paths, Daggerboards, and a New Structural Bulkhead
- Refit Progress: Templating, Infusing, and Building a New Laminating TableKey Message: A major refit is a series of small, repetitive, and precise steps. By creating a family “assembly line” for templating and infusion, we’re efficiently producing lightweight, custom composite floors while constantly improving our workshop tools. Author: Anna & Shayne Introduction: The Flooring Assembly Line The transformation of Paikea’s interior continues, one floor panel at… Read more: Refit Progress: Templating, Infusing, and Building a New Laminating Table