Topic: Successfully vacuum bagging a structural joint is the true test of composite skill. This guide details the advanced techniques for consolidating a carbon fiber laminate on a complex, multi-dimensional beam-to-hull connection. We break down the entire process, from strategic surface prep and consumable strategy to the critical art of pleating, ensuring a perfect, bridge-free cure every time.
Author: Shayne and Anna
Introduction
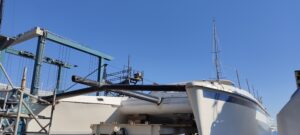
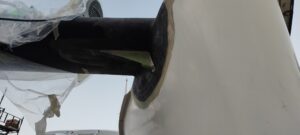
Vacuum bagging a flat panel is one thing; successfully consolidating a laminate on a complex, multi-dimensional joint is where the real skill lies. This guide walks through the process of vacuum bagging a structural carbon fiber tape that joins a beam to a hull, highlighting the techniques required to handle tight corners, compound curves, and prevent bridging.
Phase 1: Strategic Surface Preparation
Before any consumables are cut, the substrate must be prepared. For a strong, tapered bond, the overlap areas for each layer of carbon are marked directly onto the hull. This ensures a gradual reduction in laminate thickness, preventing stress concentrations. A key pro-tip is to apply the tacky tape to green masking tape first. This simple step saves significant time during cleanup, as the messy tacky tape peels away with the masking tape after the cure.
Phase 2: Understanding the Consumable Stack
The “stack” is the sequence of materials that manage resin flow and apply pressure. Each layer has a non-negotiable function:
- Peel Ply: Creates the resin-rich, textured surface essential for secondary bonding.
- Perforated Release Film: A thin plastic sheet with micro-perforations that allows excess resin to escape while preventing the breather from bonding to the part.
- Breather Felt: This textile acts as a highway for air and excess resin, ensuring an even vacuum distribution across the entire laminate, especially critical on complex shapes.
Phase 3: Bagging Strategy for Complex Shapes
The geometry of a beam-to-hull joint is a bagging challenge. The bag must transition from vertical surfaces to horizontal flats and into tight internal corners. The key is to treat each geometric feature individually.
- Peel Ply & Breather Application: Instead of using single large pieces, these materials are applied in multiple sections with butt joints or small overlaps. This is vital at corners to prevent “bridging,” where the material spans a gap instead of pressing the laminate into the corner.
- The “Frog’s Tongue”: This is an extra section of breather felt placed away from the primary laminate. It acts as a reservoir for excess resin and a protective barrier, preventing resin from clogging the vacuum port.
Phase 4: The Art and Science of Pleating
An oversized bag is mandatory. The process begins by pinning the bag at the corners of the geometry. Once secure, the technique of pleating begins.
- Pleat Placement: Pleats are systematically placed wherever the geometry changes—especially inside corners. A pleat acts like a dart in sewing, creating excess material that allows the bag to conform tightly into a corner without stretching thin and risking a tear.
- Sequential Evacuation: After the bag is roughly positioned, the vacuum is turned on at a low level. This allows you to manually manipulate the bag, pressing out air leaks and ensuring it sinks perfectly into every contour before full vacuum pressure is applied.
Phase 5: Final Checks and Cure
Once the bag is sealed and under full vacuum, a final inspection is critical. You must visually confirm there is no bridging in corners. The sight of resin bleeding through the perforated film into the breather felt is a positive sign of proper consolidation. Finally, applying controlled heat accelerates the resin cure, minimizing the risk of bag failure or vacuum loss during the critical gelation phase.
Technical Takeaways
- Prevent Bridging: Use segmented consumables (peel ply, breather) at all complex geometry points to ensure even pressure.
- Pleating is Non-Negotiable: Strategic pleats provide the material needed for the bag to conform to 3D shapes without excessive stress.
- Manage Resin Flow: The frog’s tongue and an adequate breather layer are essential for handling excess resin and maintaining vacuum integrity.
- Accelerate the Cure: Once bagged, using heat to reduce cure time lowers the window of opportunity for something to go wrong.
Further Reading on the Project Paikea Refit
To understand the full context of this front beam project, see the entire process:
- The Carbon Fiber Longeron & America’s Cup Rig: Dual Upgrades That Transformed Our Catamaran
 Author: Shayne and Anna Key Topic: While our salvaged America’s Cup rotating rig was a monumental upgrade, the custom carbon fiber longeron stands as its crucial counterpart, fundamentally changing how we sail. This massive central pole—fabricated from the same batch of recycled America’s Cup mast sections—eliminated the need for a clumsy walkway and complex whisker stays.… Read more: The Carbon Fiber Longeron & America’s Cup Rig: Dual Upgrades That Transformed Our Catamaran
 - Carbon Fiber vs. Aluminum Beam: A Catamaran Structural Upgrade
 Topic: We replaced our Catamaran 42’s original aluminum front beam with a custom carbon fiber beam and longeron. This wasn’t just a simple material swap; it was a complete structural redesign. In this deep dive, we break down the critical engineering concept of load paths, explaining how the new system manages the immense forces from the… Read more: Carbon Fiber vs. Aluminum Beam: A Catamaran Structural Upgrade
 - Real-World Test: How Our New Carbon Front Beam Handled a Choppy SeaAuthor: Shayne and Anna Key Message: This sea trial proved that true performance isn’t just about strength or weight savings, but about how upgrades transform the sailing experience in real-world conditions. Despite the inevitable “breakdowns” that accompany any major refit, the immediate and tangible improvements—a stiffer, more balanced boat, easier speed, and transformed steering—validated the… Read more: Real-World Test: How Our New Carbon Front Beam Handled a Choppy Sea
- From America’s Cup to Our Catamaran: Rescuing a Carbon LegendAuthor: Shayne and Anna Key Message: The centerpiece of our rig is a mast with a legendary past: Rig #12 from Team New Zealand’s 2000 America’s Cup campaign. Rescued from a Valencia scrapyard where it was destined to be chopped into pieces, this carbon fiber wing mast represents an incredible piece of sailing history. We simply couldn’t stand… Read more: From America’s Cup to Our Catamaran: Rescuing a Carbon Legend
- Why We Chose Dyneema for Our Catamaran Trampoline (And How to Install It)Author: Shayne and Anna After completing our major carbon fiber front beam transformation, the final piece was installing a trampoline worthy of the upgrade. We chose Dyneema netting—the same high-performance material used for racing halyards—and installed it using professional separate lashing techniques. This approach creates an incredibly tight, safe surface that outperforms conventional trampoline systems in… Read more: Why We Chose Dyneema for Our Catamaran Trampoline (And How to Install It)
- From Racing Mast to Custom Bow Pole: Reincarnating America’s Cup CarbonKey Topic: This upgrade represents the ultimate expression of our refit philosophy: giving the world’s best materials a brilliant second life. We transformed salvaged sections of an America’s Cup mast into a complete, custom carbon fiber bow pole—the final and most rewarding piece of our new front-end system. This post details the final fabrication and fit-out,… Read more: From Racing Mast to Custom Bow Pole: Reincarnating America’s Cup Carbon
- Carbon Fiber Anchor Roller & Stealth Nav Lights – Finishing Paikea’s Front EndKey Message: With the major structural work complete, we’re adding the final functional details to Paikea’s new carbon front end. This post covers the fabrication of a custom carbon fiber anchor roller, the installation of stealth navigation lights hidden within our America’s Cup mast bow pole, and the upgrade to a raised trampoline track system—transforming the bow into a clean, capable, and… Read more: Carbon Fiber Anchor Roller & Stealth Nav Lights – Finishing Paikea’s Front End
- Engineering a Bespoke Forestay Attachment & Mastering “Wet Preg”Key Topic: Replacing our catamaran’s aluminum beam with carbon fiber meant reinventing how critical components attach. For the forestay, this led to a unique engineering solution: a custom transverse pin and slot system that channels load directly into the unidirectional carbon of our recycled America’s Cup mast. This video and post also dive into the professional… Read more: Engineering a Bespoke Forestay Attachment & Mastering “Wet Preg”
- The Vacuum Bag Reveal: Assessing Our Carbon Fiber Beam LaminateKey Message: The de-bagging process confirmed a successful vacuum bag: our complex carbon fiber beam-to-hull joint emerged perfectly consolidated into tight corners, with a peel-ply finish ready for paint after minimal sanding. This technical success, however, came with the sobering reality of high-performance composites—a significant pile of single-use plastic waste, an inherent and unavoidable byproduct… Read more: The Vacuum Bag Reveal: Assessing Our Carbon Fiber Beam Laminate
- The Pre-Splash Push: Integrating Engine Work, Composite Rudder Mods, and Custom FairingsKey Topic: Facing a firm launch deadline, we executed a coordinated final push on our catamaran’s critical systems. This involved servicing the saildrives, preparing new rudders for future winglets by installing a carbon rod backbone, and fabricating custom fairings to improve hull hydrodynamics. With a focus on engineering robust solutions—from reinforcing foils to managing a… Read more: The Pre-Splash Push: Integrating Engine Work, Composite Rudder Mods, and Custom Fairings
- Beyond Flat Panels: Vacuum Bagging a Complex Carbon Fiber Beam-to-Hull JointTopic: Successfully vacuum bagging a structural joint is the true test of composite skill. This guide details the advanced techniques for consolidating a carbon fiber laminate on a complex, multi-dimensional beam-to-hull connection. We break down the entire process, from strategic surface prep and consumable strategy to the critical art of pleating, ensuring a perfect, bridge-free… Read more: Beyond Flat Panels: Vacuum Bagging a Complex Carbon Fiber Beam-to-Hull Joint
- Installing the Carbon Fibre Martingale: Precision Fitting & Engineering NuancesAuthor: Shayne & Anna TOPICS:This post details the final installation of a critical structural component on our Catana 42. It covers the transition from 3D CAD model to physical fitting, the use of specialist adhesives for marine composites, and an in-depth engineering discussion on the importance of pre-tensioning in fixed carbon fibre assemblies. This episode covers… Read more: Installing the Carbon Fibre Martingale: Precision Fitting & Engineering Nuances
- Reinforcing the Front Beam: Engineering a Carbon Fibre MartingaleAuthor: Shayne and Anna Key Topic: This post details the fabrication of our carbon fiber Seagull Striker and Martingale. We explain the engineering logic behind reinforcing the beam and show how we press-molded a high-strength unidirectional carbon strap to replace heavy stainless steel wire. The Seagull Striker and Martingale form the critical backbone of a… Read more: Reinforcing the Front Beam: Engineering a Carbon Fibre Martingale
- Engineering a Carbon Fiber Front Beam & Longeron from America’s Cup MastsKey Message: By repurposing high-modulus carbon fiber from America’s Cup masts, we engineered a custom front-end system that is lighter, stronger, and far more functional than the original, unlocking new sail options and improving overall performance. Author: Shayne & Anna Introduction: A Dual Project Under Pressure This project captures the essence of our refit philosophy: ambitious,… Read more: Engineering a Carbon Fiber Front Beam & Longeron from America’s Cup Masts