Author: Shayne and Anna
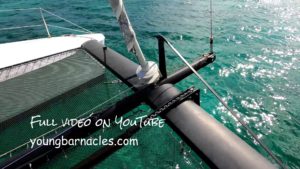
After completing our major carbon fiber front beam transformation, the final piece was installing a trampoline worthy of the upgrade. We chose Dyneema netting—the same high-performance material used for racing halyards—and installed it using professional separate lashing techniques. This approach creates an incredibly tight, safe surface that outperforms conventional trampoline systems in every way.
Why Dyneema? The Material Advantage
Most production catamarans use polyester trampoline netting, but we upgraded to Dyneema (also called Spectra) for several compelling reasons:
Superior Longevity: Dyneema is naturally UV-stable, and the black coloring contains a protective waxy dye. While the initial cost is higher, it significantly outlasts polyester nets, making it more economical over time.
Minimal Stretch: Unlike polyester nets that become loose and saggy, Dyneema maintains incredible tension. This creates a firm, stable walking surface that’s much safer in rough conditions—no more ankle-twisting on loose netting.
High Strength: Despite its lightweight feel, Dyneema offers exceptional strength-to-weight ratio, ensuring reliability even under heavy loads.
The Installation: Separate Lashings vs. Continuous Lacing
The real secret to a professional-quality trampoline lies in the lashing method. While many systems use continuous lacing around the perimeter, we opted for individual separate lashings for critical reasons:
Enhanced Safety: With separate lashings, if one line chafes through or fails, you only lose that single connection point. The rest of the trampoline remains securely attached. Continuous lacing creates a single point of failure—if one section breaks, the entire lacing can unravel.
Superior Tension Control: Separate lashings allow you to apply significantly more tension to the net. The result feels almost like walking on a solid deck rather than a flexible trampoline. This level of tension is impossible to achieve with continuous lacing systems.
Precise Alignment: Individual lashings let you micro-adjust the net’s position, ensuring the pattern lines up correctly and doesn’t look crooked or twisted.
Our Installation Process & Materials
The System Components:
- Dyneema netting from Netsystems
- 6mm Dynex/Dyneema edging rope
- 2.5mm SK78 Dyneema lashing lines cut to 900mm lengths
- 4mm 316 stainless steel rods inserted into PVC tubes
Key Installation Steps:
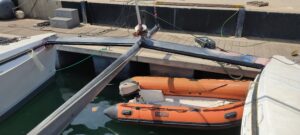
- Rod-in-Tube Foundation: Stainless steel rods slide through PVC tubes laminated into the hulls, creating durable attachment points that won’t wear from constant tension.
- Perimeter Preparation: The net edges are reinforced with Dynex rope, creating a strong boundary for attachment.
- Separate Lashing Technique: Each lashing line connects individually to the stainless rods using a specialized cinching knot that eliminates the need for time-consuming splices.
Professional Tips & Maintenance
The Cinching Knot Advantage: Instead of splicing each lashing line (which takes days), we use a simple two-thumb knot configuration that hides within the lashing. This provides the same clean appearance while saving countless hours of labor.
Retention Schedule: Even low-stretch Dyneema requires initial retentioning. The loose weave of knotless netting needs 3-4 retentioning sessions as the weave settles and tightens. After this initial period, the trampoline typically only needs attention once per year or even less frequently.
Why It’s Worth the Effort: The installation is time-consuming but creates a trampoline system that’s in a different class from production boat standards. The safety, comfort, and longevity benefits make the investment worthwhile for any serious cruiser.
Conclusion: A Professional-Grade Result
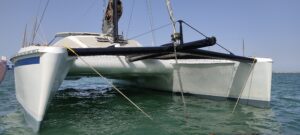
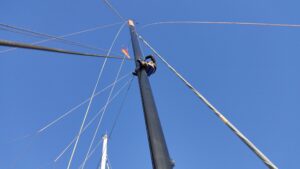
Our new Dyneema trampoline completes the transformation of Paikea’s front end, matching the quality of our carbon fiber beam, martingale, and bow pole. The drum-tight surface provides safe footing in all conditions, while the separate lashing system ensures long-term reliability. It’s another example of how choosing the right materials and techniques can dramatically improve a boat’s functionality and safety.
Two years, two oceans, and endless Caribbean sun – and our Dyneema trampoline netting still looks and performs like new. This is our long-term review of the high-performance netting we installed, showing why it was worth every penny compared to the standard polyester nets that failed in under two years.
After constant use (and kid abuse!) in both Mediterranean and Caribbean conditions, the Dyneema shows virtually no UV degradation and minimal stretch. The only maintenance needed? Tightening a few temporary knots we should have properly finished!
Continue following our refit journey:
- The Carbon Fiber Longeron & America’s Cup Rig: Dual Upgrades That Transformed Our Catamaran
 Author: Shayne and Anna Key Topic: While our salvaged America’s Cup rotating rig was a monumental upgrade, the custom carbon fiber longeron stands as its crucial counterpart, fundamentally changing how we sail. This massive central pole—fabricated from the same batch of recycled America’s Cup mast sections—eliminated the need for a clumsy walkway and complex whisker stays.… Read more: The Carbon Fiber Longeron & America’s Cup Rig: Dual Upgrades That Transformed Our Catamaran
 - Carbon Fiber vs. Aluminum Beam: A Catamaran Structural Upgrade
 Topic: We replaced our Catamaran 42’s original aluminum front beam with a custom carbon fiber beam and longeron. This wasn’t just a simple material swap; it was a complete structural redesign. In this deep dive, we break down the critical engineering concept of load paths, explaining how the new system manages the immense forces from the… Read more: Carbon Fiber vs. Aluminum Beam: A Catamaran Structural Upgrade
 - Real-World Test: How Our New Carbon Front Beam Handled a Choppy SeaAuthor: Shayne and Anna Key Message: This sea trial proved that true performance isn’t just about strength or weight savings, but about how upgrades transform the sailing experience in real-world conditions. Despite the inevitable “breakdowns” that accompany any major refit, the immediate and tangible improvements—a stiffer, more balanced boat, easier speed, and transformed steering—validated the… Read more: Real-World Test: How Our New Carbon Front Beam Handled a Choppy Sea
- From America’s Cup to Our Catamaran: Rescuing a Carbon LegendAuthor: Shayne and Anna Key Message: The centerpiece of our rig is a mast with a legendary past: Rig #12 from Team New Zealand’s 2000 America’s Cup campaign. Rescued from a Valencia scrapyard where it was destined to be chopped into pieces, this carbon fiber wing mast represents an incredible piece of sailing history. We simply couldn’t stand… Read more: From America’s Cup to Our Catamaran: Rescuing a Carbon Legend
- Why We Chose Dyneema for Our Catamaran Trampoline (And How to Install It)Author: Shayne and Anna After completing our major carbon fiber front beam transformation, the final piece was installing a trampoline worthy of the upgrade. We chose Dyneema netting—the same high-performance material used for racing halyards—and installed it using professional separate lashing techniques. This approach creates an incredibly tight, safe surface that outperforms conventional trampoline systems in… Read more: Why We Chose Dyneema for Our Catamaran Trampoline (And How to Install It)

Materials we used for this project
- -Dyneema netting from Netsystems https://www.net-sys.com/
- -Edging 6mm dynex/dyneema with a dyneema cover (this cover is not essential)
- -lashing 2.5mm SK 78 cut to 900mm long lengths
- -metal rod 4mm 316 stainless steel