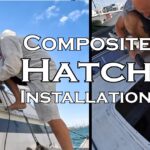
Key Topic: After months of building custom composite hatches, we reach the transformative stage: making them watertight and bringing in light. This hands-on guide walks you through our exact process of installing thick acrylic lenses, designing effective 3D-printed drainage, and using the right sealant for a perfect, professional bond. See the step-by-step techniques that turn a fiberglass shell into a clear, durable, and leak-proof marine hatch.
Author: Shayne and Anna
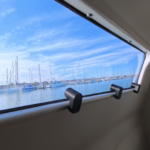
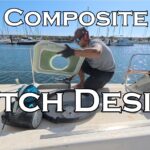
It’s Go Time: The Hatch Lenses Are Here
The moment we’ve been waiting for has arrived. The custom-cut acrylic lenses for our hand-built composite hatches are finally in hand. This isn’t just about adding windows; it’s the critical step that transforms a dark fiberglass opening into a source of light and a waterproof structure. Seeing them test-fitted for the first time—clear, thick, and perfectly sized—validates all the meticulous mold-making and fiberglass work from earlier stages. The visual progress is immediate and incredibly satisfying.
Why Drainage Can’t Be an Afterthought
Before a single drop of sealant is applied, you have to solve for water. A hatch that traps water is a hatch that will eventually leak. We discovered this firsthand after a rain shower left a “little swimming pool” in our unsealed hatch rim.
Our drainage philosophy is simple: Design for the water you’ll actually see. For our forward hatches, which could encounter green water over the deck, we installed two drains. For this aft hatch, protected by the boat’s shear line, only rainwater is a concern. By observing where rain naturally pooled, we confirmed a single outboard drain was sufficient. The logic is sound: if this hatch is taking solid water over it, a second drain is the least of our worries.
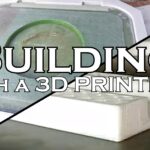
The 3D-Printed Drain Solution: Custom, Cheap & Effective
Off-the-shelf fittings rarely fit custom builds perfectly. Our solution? Design and 3D-print our own. Using PETG plastic for its chemical resistance, we created a drain that slots perfectly into the hatch rim’s contour. The process is straightforward:
- Trim & Test: Sand and dry-fit the printed part.
- Mark & Drill: Drill a small pilot hole from the inside to mark the center.
- Ream & Shape: Enlarge the hole from the outside to the final drain tube size.
- Glue & Glass: Epoxy the drain in place and overlay with a fiberglass tab for strength.
It’s a perfect example of how modern tools solve traditional boatbuilding problems with precision.
MS Polymer vs. Urethane: The Sealant Showdown
This is a hot debate in marine circles. Many automatically reach for popular polyurethane sealants (like Sikaflex). We chose MS Polymer (Modified Silane) for critical reasons:
- No Primers Needed: It bonds tenaciously to both fiberglass and acrylic with just simple solvent cleaning and sanding. Urethanes often require specific, fussy primers.
- Superior Flexibility: It remains elastic across a wider temperature range, accommodating the different expansion rates of fiberglass and acrylic without losing bond.
- Easier to Tool: Its consistency is more forgiving for a clean, professional finish.
For a glued-in lens that needs to handle thermal stress and hull flex, MS Polymer is the superior technical choice.
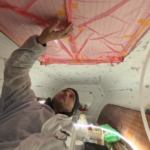
The Step-by-Step Lens Installation
Here’s the exact process we used for a watertight, professional install:
- Surface Prep: Sand the fiberglass recess with 80-grit to create a “tooth” for the sealant. Clean thoroughly with acetone.
- Spacer Installation: We used closed-cell foam tape around the recess to center the 8mm acrylic in the 15mm deep trough. This ensures a consistent, thick sealant bed around the lens.
- Sealant Application: Load a high-quality caulking gun and apply a generous, continuous bead of MS Polymer into the recess.
- Lens Placement: Carefully lower the acrylic lens into the bed of sealant. Avoid sliding it around.
- Clamping Strategy: Place wooden battens across the lens to distribute pressure evenly. Use clamps to squeeze out excess sealant until you see a consistent bead around the entire perimeter. This ensures full contact and no air pockets.
- The Two-Stage Fill (For Deep Recesses): Our 7mm gap was too deep to fill in one go. We did an initial clamp-up, let it cure for 24 hours, then came back to inject a final finishing bead. This prevents uncured sealant in the center of a too-thick layer.
Saving Time: The Foam Insert Method
Around the hatch opening, we faced complex, uneven gaps between structural members. Instead of trying to sand in difficult spaces, we decided to fill in the gap between the hatch rim and the outboard hull, we used a foam-and-glass method:
- Cut closed-cell foam scraps to shape the gap.
- Glue them in place with polyester resin mix.
- Apply a single layer of fiberglass cloth over the foam.
- Fair smooth.
This saves time, and creates a much nicer affect for the final finish.
Non-Skid is Non-Negotiable
A smooth, painted fiberglass hatch on deck is a safety hazard. The final exterior step is applying non-skid. We mix non-skid granules directly into the topcoat paint for a consistent, gritty texture. Pay extra attention to the area around the lens—this is where a foot is most likely to slip.
The Final Reveal: Light Where There Was None
The transformation is profound. The moment the clamps come off and light floods through the clear acrylic into the boat’s interior, the project reaches a new phase. It’s no longer just a construction site; it starts to feel like a living space. The clean, modern look of the flushed lens, the robust drain, and the faired edges all speak to a professional, durable build.
What’s Next: Seals, Hardware & Final Paint
With lenses and drains installed, our hatches are now functional structures. The upcoming final steps include:
- Installing the compression weather seal in the rim.
- Mounting hinges and locking hardware.
- Applying the final interior and exterior paint systems.
Each step builds on this foundation, moving us closer to the goal: robust, beautiful, and completely watertight composite hatches we built ourselves.
Composite Hatches
To follow more of our comprehensive Composite Hatch Construction Series where we designed our hatches, built the molds and hatches through to installation see our links to blog posts here.
- Boat Hatch Build: Installing Lenses & Drains for a Watertight Finish
 Key Topic: After months of building custom composite hatches, we reach the transformative stage: making them watertight and bringing in light. This hands-on guide walks you through our exact process of installing thick acrylic lenses, designing effective 3D-printed drainage, and using the right sealant for a perfect, professional bond. See the step-by-step techniques that turn… Read more: Boat Hatch Build: Installing Lenses & Drains for a Watertight Finish
 - The Professional’s Approach: Replacing a Problematic Hatch with a Proven Structural PortlightTopic Overview: We permanently eliminate a chronic leak point and increase deck panel strength by removing a problematic overhead hatch and glassing in a solid, camber-matched core. In its place, we install a robust, under-gunwale structural portlight—applying proven marine engineering for a drier, stiffer, and more reliable cabin. Author: Shayne and Anna The Problem: When a… Read more: The Professional’s Approach: Replacing a Problematic Hatch with a Proven Structural Portlight
- Hull Weight Reduction & Flush Hatch Installation: Paikea Refit UpdateKey Message: Significant weight reduction is not just about going faster; it’s about returning a performance multihull to its designed potential, which requires a systematic, professional approach to refitting. Author: Anna and Shayne Introduction This refit update marks a turning point on Project Paikea. After years of incremental work, we are now executing a coordinated push to… Read more: Hull Weight Reduction & Flush Hatch Installation: Paikea Refit Update
- Professional Hatch Installation: Solving Leaks with Precision EngineeringKey Message: This post documents two distinct professional upgrades on our Catana 42 refit: the precise installation of custom composite deck hatches and the full conversion of leaky portlights to watertight, outward-opening hatches. The first section covers the use of 3D-printed jigs for perfect deck hatch alignment, while the second details the engineering behind designing… Read more: Professional Hatch Installation: Solving Leaks with Precision Engineering
- Building Composite Hatches Using 3D Printed MoldsKey Message: Precise, Accessible Fabrication with 3D Printed ToolingBuilding custom composite hatches requires tooling that can accurately capture complex geometry. This project demonstrates a practical approach: using 3D printed molds for both the hatch lid and its frame. This method allows for precise, repeatable fabrication of composite parts with seal gutters and complex profiles, bridging… Read more: Building Composite Hatches Using 3D Printed Molds
- Engineering Custom Composite Hatches: A Systematic ApproachTopic: A detailed breakdown of the design and engineering process for creating custom composite deck hatches, covering problem analysis, material selection, structural integration, and the use of 3D printing for prototyping and manufacturing. Author: Shayne and Anna The original deck hatches on our Catana 42, Paikea, had served for over three decades. While built to last, their design… Read more: Engineering Custom Composite Hatches: A Systematic Approach