Key Message: A professional finish is 90% preparation. The glamour of a new paint job is entirely dependent on the meticulous, unglamorous work of surface preparation and problem-solving that happens first.
Author: Anna and Shayne
Introduction
On social media, boat refits are often condensed into satisfying “before and after” reveals. What they skip is the middle—the thousands of hours of messy, tedious, and critical work that makes the “after” possible. This update from Project Paikea is dedicated to that essential, unsexy phase: the fairing, filling, and inevitable repair of hidden problems that define a quality refit.
Beyond the Hatches: The Interior Transformation
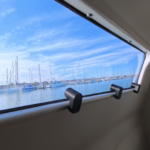
With our custom composite flush hatches installed, the focus has shifted to the interior of the port hull. This is a space of transformation, where we are methodically converting a structural shell into a finished living space.
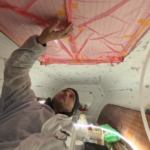
- Systematic Surface Prep: Every square inch of the interior is being prepared for paint. This involves identifying low spots, filling old fastener holes and penetrations, and applying fairing compound to create a perfectly smooth substrate.
- Ergonomic Improvements: We’ve widened and raised all doorways to 550mm, improving movement and airflow. Each opening has been structurally reinforced with unidirectional fiber and composite edge capping.
- Weight Tracking: Our systematic approach to weight reduction continues. Every piece of removed timber and every new composite part is weighed. To date, we are 650 kg (1,433 lbs) lighter on the port hull alone, net of all new structure, putting us well on track to remove a full ton from the boat.
The Inevitable Discovery: Uncovering Hidden Damage
A universal rule of boat refits is that you will always find more work than you planned. During what was meant to be routine fairing, we discovered a significant issue.
- The Problem: A crack in the interior laminate led us to a “bubble,” which, when investigated, revealed a hole straight through to the outside, hidden within a cockpit locker.
- The Cause: This was a classic case of water ingress due to a failed sealant job, leading to rot in the core and a compromised structural connection.
- The Professional Mindset: Instead of being a setback, this is simply part of the process. Finding and fixing these issues is what restores a boat’s integrity and longevity.
The “Easy” Repair: A Methodical Approach to a Complex Problem
In refit terms, the “easy” solution is the most efficient one that permanently solves the problem without unnecessary work.
- The Plan: The repair involved emptying the locker, cutting away the poorly applied filler (“bog”), and laminating a new fiberglass tabbing to securely tie the structural plywood back to the hull.
- The “Hard” Solution: For context, the “hard” solution would have been to completely remove and replace the entire structural member—a lesson in why the first step is always to assess the least invasive, most effective repair.
- The Takeaway: A good marine professional doesn’t just reach for a grinder; they diagnose the failure and apply a targeted, engineered solution.
Conclusion: Where the Real Quality is Built
The shine of fresh paint gets all the attention, but the true quality of a refit is built in these unsexy stages. The perfect fairing line, the seamlessly filled hole, the hidden structural repair—these are the details that define a professional outcome. This phase requires patience, a sharp eye for detail, and a willingness to embrace the dust and the discovery of new problems. It’s not the most glamorous work, but it is the most important.
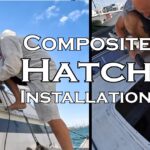
Follow our Hatch Design and Build
This video showcases our custom designed composite flush hatches. If you would like to see the entire process from concept to installation check out our series below:
- Boat Hatch Build: Installing Lenses & Drains for a Watertight Finish
 Key Topic: After months of building custom composite hatches, we reach the transformative stage: making them watertight and bringing in light. This hands-on guide walks you through our exact process of installing thick acrylic lenses, designing effective 3D-printed drainage, and using the right sealant for a perfect, professional bond. See the step-by-step techniques that turn… Read more: Boat Hatch Build: Installing Lenses & Drains for a Watertight Finish
 - The Professional’s Approach: Replacing a Problematic Hatch with a Proven Structural PortlightTopic Overview: We permanently eliminate a chronic leak point and increase deck panel strength by removing a problematic overhead hatch and glassing in a solid, camber-matched core. In its place, we install a robust, under-gunwale structural portlight—applying proven marine engineering for a drier, stiffer, and more reliable cabin. Author: Shayne and Anna The Problem: When a… Read more: The Professional’s Approach: Replacing a Problematic Hatch with a Proven Structural Portlight
- Hull Weight Reduction & Flush Hatch Installation: Paikea Refit UpdateKey Message: Significant weight reduction is not just about going faster; it’s about returning a performance multihull to its designed potential, which requires a systematic, professional approach to refitting. Author: Anna and Shayne Introduction This refit update marks a turning point on Project Paikea. After years of incremental work, we are now executing a coordinated push to… Read more: Hull Weight Reduction & Flush Hatch Installation: Paikea Refit Update
- Professional Hatch Installation: Solving Leaks with Precision EngineeringKey Message: This post documents two distinct professional upgrades on our Catana 42 refit: the precise installation of custom composite deck hatches and the full conversion of leaky portlights to watertight, outward-opening hatches. The first section covers the use of 3D-printed jigs for perfect deck hatch alignment, while the second details the engineering behind designing… Read more: Professional Hatch Installation: Solving Leaks with Precision Engineering
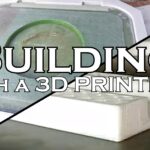
- Building Composite Hatches Using 3D Printed MoldsKey Message: Precise, Accessible Fabrication with 3D Printed ToolingBuilding custom composite hatches requires tooling that can accurately capture complex geometry. This project demonstrates a practical approach: using 3D printed molds for both the hatch lid and its frame. This method allows for precise, repeatable fabrication of composite parts with seal gutters and complex profiles, bridging… Read more: Building Composite Hatches Using 3D Printed Molds