Topic Overview: This post explains the structural engineering behind making penetrations in boat bulkheads. We’ll dissect why failures happen, using real-world examples, and detail a three-part reinforcement strategy to create a strong, reliable opening that maintains the integrity of the entire structure.
Author: Shayne and Anna
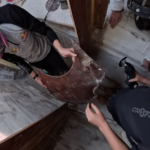
A bulkhead is not just a wall; it is a primary structural member that ties the hull and deck together, creating a rigid torsion box. Every hole drilled into it severs the continuous fibers that carry load, creating a discontinuity and a potent stress concentration point. Doing this incorrectly is a recipe for failure.
The much-discussed issues with some production catamarans highlight a widespread problem: a misunderstanding of how to safely penetrate a structural core.
Why Holes Are a Problem: The Science of Load Paths
The Three-Part Solution for a Structural Penetration
Best Practice: Designing from the Start
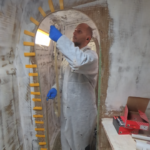
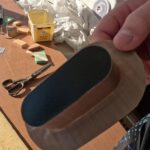
Practical Application: The Flanged Plug System
Conclusion
Implement This Technique: Get the Plug File
Understanding the theory is one thing; having the right tool for the job is another. To make it easy for you to apply this professional method, we are offering the 3D print file (STL) for the penetration plug used in this video as a free download.
How to Get It:
Want More?
Deep dive into our material on modifying bulkheads correctly in the posts below.
- Diagnosing and Repairing Hull Delamination and Core Damage.
 The Problem: From Floor Installation to Structural Repair Author: Shayne and Anna During the installation of new cabin soles in our Catana 42 refit, a routine task uncovered a significant structural issue. The discovery process is a textbook example of why systematic disassembly is critical. Initial Indicators: The Technical Failure:In a cored composite structure (like… Read more: Diagnosing and Repairing Hull Delamination and Core Damage.
 - Bulkhead Reinforcement on a Catamaran: Beam Theory ExplainedBulkhead Reinforcement on a Performance Catamaran Why Beam Theory Matters More Than “More Fibreglass” During refits, bulkheads often get treated as simple partitions—something to hang doors off or separate spaces. On a performance multihull, that assumption can be dangerously wrong. On Paikea, our 1990 Lock Crowther Catana 42s, bulkheads are structural elements. They tie hull… Read more: Bulkhead Reinforcement on a Catamaran: Beam Theory Explained
- Modifying Boat Bulkheads: The Engineering Behind Increasing HeadroomTopic Overview: This post details the process and engineering rationale behind cutting down a structural bulkhead to improve livability. We explain the load path disruption, the calculations for reinforcement, and the practical execution using unidirectional carbon fiber to restore and enhance structural integrity. Author: Shayne and Anna A boat refit often involves a trade-off between structural integrity… Read more: Modifying Boat Bulkheads: The Engineering Behind Increasing Headroom
- Bulkhead Reinforcement: Unidirectional Fibreglass and Edge CappingRestoring structural integrity and finishing a cut composite panel. Author: Shayne Key Message: Cutting into a cored panel necessitates a two-stage process to restore its structural integrity: first, reintroducing in-plane stiffness and strength along the cut edge with a strategic reinforcement (like unidirectional glass); and second, re-establishing the critical load path between the skins and sealing the core with… Read more: Bulkhead Reinforcement: Unidirectional Fibreglass and Edge Capping
- Weight, Performance, and Payload: The Logic Behind Our Catamaran RefitTopics: An engineering analysis of weight reduction in a catamaran refit, covering the strategic goals of increasing payload capacity and the critical considerations of balance, center of gravity, and structural integrity. Author: Shayne & Anna The systematic replacement of Paikea’s timber interior with composite structures continues with the installation of a new bunk and bulkhead. This work is part… Read more: Weight, Performance, and Payload: The Logic Behind Our Catamaran Refit
- The Right Way to Laminate a Penetration in a Composite StructureAuthor: Shayne and Anna Topic Overview: This post details the professional method for creating a strong, watertight penetration in a fiberglass hull or bulkhead. We cover the laminate rule of thumb, the step-by-step laminating technique using a 3D-printed plug, and the critical design feature that ensures the plug can be removed. Every hole drilled in a boat… Read more: The Right Way to Laminate a Penetration in a Composite Structure
- The Correct Way to Put a Hole in a Structural BulkheadTopic Overview: This post explains the structural engineering behind making penetrations in boat bulkheads. We’ll dissect why failures happen, using real-world examples, and detail a three-part reinforcement strategy to create a strong, reliable opening that maintains the integrity of the entire structure. Author: Shayne and Anna A bulkhead is not just a wall; it is a primary… Read more: The Correct Way to Put a Hole in a Structural Bulkhead
- Composite Door Installation, Flow Coat Application, and Steering System AnalysisAuthor: Shayne and Anna Topic: This post details the ongoing refit of the starboard stateroom, focusing on the practical installation of a composite door and the application of flow coat as a substrate for insulation. It provides a technical analysis of chronic hydraulic steering failures, evaluating the components beyond repair and outlining the engineering rationale for a… Read more: Composite Door Installation, Flow Coat Application, and Steering System Analysis
- Managing Multiple Refit Projects: Chainplates, Windows, and RiggingKey Message: Coordinated Project ExecutionPreparing a boat for an ocean crossing often involves a final push to complete a list of outstanding projects. For us, this meant simultaneously executing three key tasks: installing the second carbon fiber chainplate, repairing rotten window frames, and adjusting the forestay. This article outlines how we managed these parallel projects… Read more: Managing Multiple Refit Projects: Chainplates, Windows, and Rigging
- The Engineering Behind Our Bulletproof Composite ChainplatesAuthor: Shayne and Anna Key Topic: Replacing our catamaran’s rotten, failing chainplates became an exercise in advanced composite engineering. By moving from a traditional bolted stainless steel strap to a fully integrated carbon fiber chainplate laminated within a new foam-core bulkhead, we eliminated the weak points of the old system. This post breaks down how distributing… Read more: The Engineering Behind Our Bulletproof Composite Chainplates
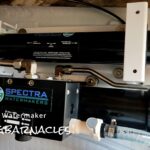
- How to Bolt into Carbon Fibre: Threaded Inserts vs. HelicoilsKey Message: Mounting hardware to a carbon fibre structure requires a method that ensures both ultimate strength and long-term serviceability. For our Spectra watermaker installation, this meant bonding custom carbon plates to the bulkhead and using threaded inserts—specifically, thread certs—to create a robust, removable mount without drilling into the primary laminate. This approach, which we break… Read more: How to Bolt into Carbon Fibre: Threaded Inserts vs. Helicoils