Key Message: Significant weight reduction is not just about going faster; it’s about returning a performance multihull to its designed potential, which requires a systematic, professional approach to refitting.
Author: Anna and Shayne
Introduction
This refit update marks a turning point on Project Paikea. After years of incremental work, we are now executing a coordinated push to strip, rebuild, and finish the interior of our vintage Catana 42. The core driver is weight. When we acquired Paikea, she was hundreds of kilograms over her designed displacement, hampered by water-damaged timber, and leaky original fittings.
Our goal is ambitious: remove one ton of excess weight. In this post, we’ll walk through our latest progress, from the installation of custom composite hatches to the final fairing and painting, and explain the engineering behind the details.
The “Why”: The Critical Impact of Weight on a Catamaran
The decision to gut and rebuild Paikea’s interior wasn’t taken lightly. It’s a direct response to a fundamental principle of multihull design: weight is the enemy of performance.
- The Goal: Remove 1,000 kg (approximately one ton) of excess weight.
- The Progress So Far: We have already removed 650 kg from Paikea, and this figure is net—it accounts for the new composite structure we’ve installed to replace the old timber.
- The Performance Payoff: This weight loss directly translates to a higher waterline, less wetted surface area, improved acceleration, and reduced pitching. It brings Paikea back to the weight envelope her designer, Lock Crowther, intended.
The “What”: A Systems-Wide Refit Approach
Our work is not isolated to a single area. We are attacking weight and modernizing systems across the entire boat.
- Composite Furniture & Structure: All rotting timber furniture and structural components are being replaced with vacuum-bagged composite panels, using foam cores and glass or carbon skin. This is stronger, impervious to rot, and significantly lighter.
- Widening Doorways: We’ve widened and refined doorways and openings, not just for aesthetics, but to improve ergonomics and airflow below decks.
- Carbon Fibre Hardtop: Our custom hardtop is being fine-tuned and finished, a project that showcases the level of fit and finish we’re applying across the boat.
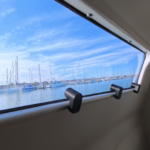
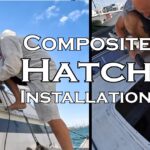
The “How”: Installing Custom Composite Flush Hatches
The last three video deep-dives have focused on the design and fabrication of our composite flush hatches. We are now in the installation phase.
- The Fit-Out: The hatches are being bonded and laminated into place, creating a strong, waterproof, and seamless connection to the deck.
- Integrated Drainage: A critical detail for any deck fitting is water management. For our hatches and staunchion sockets, we’ve designed and 3D-printed custom drainage tubes. These tubes channel water from the gutter of the fitting directly to a drain hole in the hull side, preventing any water ingress or pooling.
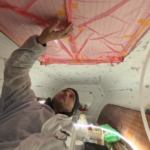
The Finish Line: Pre-Paint Prep and Painting
A professional refit is defined by the finish. We are now in the final stages of preparation before the interior paint goes on.
- Fairing and Bogging: Every surface is being faired and smoothed with epoxy bog (fairing compound) to create a perfect substrate for painting.
- Dust Management: Before any paint is mixed, the entire area is meticulously cleaned and dusted to ensure a flawless, professional-grade finish.
- Paint System: We are using a two-part polyurethane paint system, chosen for its durability, chemical resistance, and high-gloss finish that is easy to clean and will last for years. TK Rom and International Systems are both used on Paikea.
Conclusion: Connecting Engineering to Execution
This phase of the Paikea refit demonstrates a core Youngbarnacles principle: every action, from the largest weight-saving decision to the smallest 3D-printed drain, is guided by engineering logic and professional practice. The goal isn’t just a boat that looks new, but a boat that performs better than the day it was launched.
Further Reading
Follow the entire hatch installation series from concept to design, build and installation.
- Boat Hatch Build: Installing Lenses & Drains for a Watertight Finish
 Key Topic: After months of building custom composite hatches, we reach the transformative stage: making them watertight and bringing in light. This hands-on guide walks you through our exact process of installing thick acrylic lenses, designing effective 3D-printed drainage, and using the right sealant for a perfect, professional bond. See the step-by-step techniques that turn… Read more: Boat Hatch Build: Installing Lenses & Drains for a Watertight Finish
 - The Professional’s Approach: Replacing a Problematic Hatch with a Proven Structural PortlightTopic Overview: We permanently eliminate a chronic leak point and increase deck panel strength by removing a problematic overhead hatch and glassing in a solid, camber-matched core. In its place, we install a robust, under-gunwale structural portlight—applying proven marine engineering for a drier, stiffer, and more reliable cabin. Author: Shayne and Anna The Problem: When a… Read more: The Professional’s Approach: Replacing a Problematic Hatch with a Proven Structural Portlight
- Hull Weight Reduction & Flush Hatch Installation: Paikea Refit UpdateKey Message: Significant weight reduction is not just about going faster; it’s about returning a performance multihull to its designed potential, which requires a systematic, professional approach to refitting. Author: Anna and Shayne Introduction This refit update marks a turning point on Project Paikea. After years of incremental work, we are now executing a coordinated push to… Read more: Hull Weight Reduction & Flush Hatch Installation: Paikea Refit Update
- Professional Hatch Installation: Solving Leaks with Precision EngineeringKey Message: This post documents two distinct professional upgrades on our Catana 42 refit: the precise installation of custom composite deck hatches and the full conversion of leaky portlights to watertight, outward-opening hatches. The first section covers the use of 3D-printed jigs for perfect deck hatch alignment, while the second details the engineering behind designing… Read more: Professional Hatch Installation: Solving Leaks with Precision Engineering
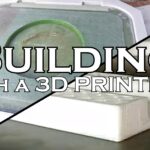
- Building Composite Hatches Using 3D Printed MoldsKey Message: Precise, Accessible Fabrication with 3D Printed ToolingBuilding custom composite hatches requires tooling that can accurately capture complex geometry. This project demonstrates a practical approach: using 3D printed molds for both the hatch lid and its frame. This method allows for precise, repeatable fabrication of composite parts with seal gutters and complex profiles, bridging… Read more: Building Composite Hatches Using 3D Printed Molds