Topic Overview: We permanently eliminate a chronic leak point and increase deck panel strength by removing a problematic overhead hatch and glassing in a solid, camber-matched core. In its place, we install a robust, under-gunwale structural portlight—applying proven marine engineering for a drier, stiffer, and more reliable cabin.
Author: Shayne and Anna
The Problem: When a Standard Hatch Fails in Service
On a performance catamaran, every component must perform. The original forward deck hatch over the starboard bunk on our Catana 42 Paikea had become a liability. Despite its conventional design, it was a persistent leak point, channeling water directly into a sleeping space during rain. In a professional refit, we don’t just patch leaks; we engineer durable solutions. This hatch’s failure was the catalyst for reassessing the entire water management system for that cabin.
The Applied Solution: Adapting Proven Principles
The decision to seal the deck opening and install a side portlight isn’t novel in marine architecture, but its application here is deliberate. We’re employing established, sound engineering principles to solve our specific problem:
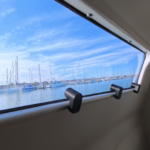
- Relocate the Opening: Positioning the new port under the gunwale utilizes simple physics—water falls down. This shelters it from direct rain and spray, a logical step for a forepeak berth.
- Maintain Structural Integrity: The new portlight uses a frame built to the same robust specification as our other deck hatches. We’re applying a known, reliable sealing and bonding methodology to a different location on the hull.
- Increase Panel Stiffness: Removing a large deck opening and properly glassing in a solid core creates a stronger, more monocoque deck structure—a fundamental benefit of good composite repair.
Methodology: Executing to a Professional Standard
The work documented follows a hybrid laminate approach, chosen for its suitability to a one-off repair within an active refit schedule.
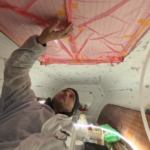
- Core Work: The deck’s camber required the replacement foam core to be precision-fit in multiple sections to ensure a perfect, continuous bond—a detail critical for long-term integrity.
- Hand Lamination (Outer Skin): We laminated two layers of 1200gsm multi-axial cloth, using a squeegee for superior consolidation on this type of fabric. The result is a tough, impact-resistant skin.
- Vacuum Infusion (Inner Skin): The interior skin was set up for infusion, ensuring optimal resin-to-glass ratio and a void-free laminate—the professional standard for this type of one-sided repair.
- The Hallmark of Good Practice: Note the pleats in the vacuum bagging around the feed lines. A common sign of a rushed infusion is a resin “snake trail” permanently cast into the laminate. Proper technique involves lifting these lines off the work to ensure a clean, flat interior finish.
Crew-Centric Design Outcome
Beyond the composite work, this change improves livability. A low-side opening provides excellent, draft-resistant ventilation to a sleeping cabin, eliminating the risk of a soaked bunk. It transforms a vulnerable point into a reliable, functional asset.
Key Takeaways for the Serious Sailor
- Apply Proven Logic: Good solutions often come from correctly applying established engineering principles to your specific problem.
- Execution is Everything: The difference between a good idea and a lasting repair lies in the meticulousness of the execution—from core fit to bagging details.
- Design for Reliability: Systems should be judged by their performance under pressure, not just their convenience in calm conditions.
This documentation isn’t about inventing new methods; it’s about demonstrating how professional standards and careful execution are applied to achieve a durable, seaworthy result on a liveaboard performance vessel.
Related Systems & Methodology
This modification is part of our integrated approach to deck integrity and water management. The structural portlight installed here applies the same core engineering principles and fabrication standards as our custom flush hatches. For the complete picture on how we design, build, and install these critical sealed openings, explore our related deep dives on the full hatch system.
- Boat Hatch Build: Installing Lenses & Drains for a Watertight Finish
 Key Topic: After months of building custom composite hatches, we reach the transformative stage: making them watertight and bringing in light. This hands-on guide walks you through our exact process of installing thick acrylic lenses, designing effective 3D-printed drainage, and using the right sealant for a perfect, professional bond. See the step-by-step techniques that turn… Read more: Boat Hatch Build: Installing Lenses & Drains for a Watertight Finish
 - The Professional’s Approach: Replacing a Problematic Hatch with a Proven Structural PortlightTopic Overview: We permanently eliminate a chronic leak point and increase deck panel strength by removing a problematic overhead hatch and glassing in a solid, camber-matched core. In its place, we install a robust, under-gunwale structural portlight—applying proven marine engineering for a drier, stiffer, and more reliable cabin. Author: Shayne and Anna The Problem: When a… Read more: The Professional’s Approach: Replacing a Problematic Hatch with a Proven Structural Portlight
- Hull Weight Reduction & Flush Hatch Installation: Paikea Refit UpdateKey Message: Significant weight reduction is not just about going faster; it’s about returning a performance multihull to its designed potential, which requires a systematic, professional approach to refitting. Author: Anna and Shayne Introduction This refit update marks a turning point on Project Paikea. After years of incremental work, we are now executing a coordinated push to… Read more: Hull Weight Reduction & Flush Hatch Installation: Paikea Refit Update
- Professional Hatch Installation: Solving Leaks with Precision EngineeringKey Message: This post documents two distinct professional upgrades on our Catana 42 refit: the precise installation of custom composite deck hatches and the full conversion of leaky portlights to watertight, outward-opening hatches. The first section covers the use of 3D-printed jigs for perfect deck hatch alignment, while the second details the engineering behind designing… Read more: Professional Hatch Installation: Solving Leaks with Precision Engineering
- Building Composite Hatches Using 3D Printed MoldsKey Message: Precise, Accessible Fabrication with 3D Printed ToolingBuilding custom composite hatches requires tooling that can accurately capture complex geometry. This project demonstrates a practical approach: using 3D printed molds for both the hatch lid and its frame. This method allows for precise, repeatable fabrication of composite parts with seal gutters and complex profiles, bridging… Read more: Building Composite Hatches Using 3D Printed Molds