Key Message: Precise, Accessible Fabrication with 3D Printed Tooling
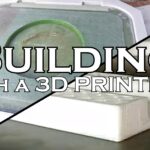
Building custom composite hatches requires tooling that can accurately capture complex geometry. This project demonstrates a practical approach: using 3D printed molds for both the hatch lid and its frame. This method allows for precise, repeatable fabrication of composite parts with seal gutters and complex profiles, bridging the gap between digital design and physical parts without professional tooling costs.
Author: Shayne and Anna
Mold Design and Fabrication: Two-Part Tooling
The process began with creating two separate, modular molds designed for our specific hatch sizes:
- Hatch Lid Mold: Designed with the complex geometry of the sealing surface and gutter.
- Frame/Gutter Mold: Created to form the structural frame that mounts to the boat.
The molds were printed in sections on a Bambu 3D printer using PETG, with jigsaw-like alignment features. A key design adaptation was a removable 60mm section, allowing one mold to produce two different hatch sizes for our boat.
The Build Process: From Mold to Part
The construction sequence involved several critical stages applied to both molds:
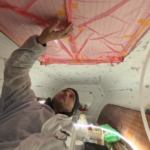
- Mold Preparation: A heavy application of release wax ensured reliable demolding. Plasticine was used to create fillets in internal corners and seal the interface between the mold and the table.
- Gel Coating: Polyester gel coat was applied as a sanding primer. It provides a white base for future painting and, due to its shrinkage, aids in releasing the part from the plastic mold.
- Lamination and Demolding: The tacky, non-waxed gel coat surface helped secure the first layer of fiberglass during lamination. Careful demolding was required due to the relatively delicate nature of the 3D printed tools.
- Post-Processing: The finished parts were trimmed using reference marks printed directly into the mold. A jigsaw was used for trimming to avoid heat buildup that can soften the polyester resin.
Conclusion: A Practical Path to Custom Composites
Using 3D printed molds is an effective method for fabricating complex composite parts like hatches. This approach provides the accuracy needed for functional components—such as sealing surfaces and drain paths—while being achievable in a limited workspace. It exemplifies the practical application of modern digital fabrication to solve traditional boat-building challenges, resulting in durable, custom-fit components.
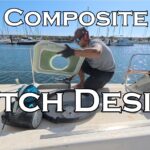
The Composite Hatch Series: From Design to Installation
This video on the build process is one part of the complete story. To see the entire project from start to finish, explore the series below, which covers the initial design philosophy, the engineering behind the sealing system, and the final installation and testing on the boat. This holistic view demonstrates the methodical approach required for a successful, professional-grade composite project.
- Engineering Custom Composite Hatches: A Systematic Approach
 Topic: A detailed breakdown of the design and engineering process for creating custom composite deck hatches, covering problem analysis, material selection, structural integration, and the use of 3D printing for prototyping and manufacturing. Author: Shayne and Anna The original deck hatches on our Catana 42, Paikea, had served for over three decades. While built to last, their design… Read more: Engineering Custom Composite Hatches: A Systematic Approach
 - Building Composite Hatches Using 3D Printed MoldsKey Message: Precise, Accessible Fabrication with 3D Printed ToolingBuilding custom composite hatches requires tooling that can accurately capture complex geometry. This project demonstrates a practical approach: using 3D printed molds for both the hatch lid and its frame. This method allows for precise, repeatable fabrication of composite parts with seal gutters and complex profiles, bridging… Read more: Building Composite Hatches Using 3D Printed Molds
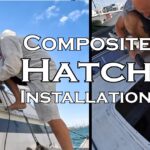
- Professional Hatch Installation: Solving Leaks with Precision EngineeringKey Message: This post documents two distinct professional upgrades on our Catana 42 refit: the precise installation of custom composite deck hatches and the full conversion of leaky portlights to watertight, outward-opening hatches. The first section covers the use of 3D-printed jigs for perfect deck hatch alignment, while the second details the engineering behind designing… Read more: Professional Hatch Installation: Solving Leaks with Precision Engineering
- Hull Weight Reduction & Flush Hatch Installation: Paikea Refit UpdateKey Message: Significant weight reduction is not just about going faster; it’s about returning a performance multihull to its designed potential, which requires a systematic, professional approach to refitting. Author: Anna and Shayne Introduction This refit update marks a turning point on Project Paikea. After years of incremental work, we are now executing a coordinated push to… Read more: Hull Weight Reduction & Flush Hatch Installation: Paikea Refit Update
- The Professional’s Approach: Replacing a Problematic Hatch with a Proven Structural PortlightTopic Overview: We permanently eliminate a chronic leak point and increase deck panel strength by removing a problematic overhead hatch and glassing in a solid, camber-matched core. In its place, we install a robust, under-gunwale structural portlight—applying proven marine engineering for a drier, stiffer, and more reliable cabin. Author: Shayne and Anna The Problem: When a… Read more: The Professional’s Approach: Replacing a Problematic Hatch with a Proven Structural Portlight

Want the Files?
Ready to build your own? We’re providing the digital blueprints. As part of the Youngbarnacles Members Hub, you get access to the complete 3D print files (STLs) for these hatch molds. It’s our way of giving you the practical tools to apply these professional techniques to your own boat.