Solving the Boat Storage Puzzle: Strong, Custom & Lightweight Shelves
One of the eternal challenges of living on a boat is creating functional storage without adding unnecessary weight. Every kilogram counts, and every millimeter of space is precious. In our latest project, we tackled this head-on by designing, building, and installing a custom composite shelf and cupboard unit in our sailboat’s cabin.
This post walks you through the entire process, from the initial design to the final coat of paint. If you’ve ever wondered how to integrate strong, lightweight storage solutions into a curved and complex boat interior, this is for you.
The Build Process: A Step-by-Step Overview
1. The Design: It’s All About the “Eyeball” Test
The first challenge wasn’t just making the shelf fit—it was making it look right. On a boat, you’re dealing with a cockpit sole that slopes one way, decks that angle another, and settees on their own plane. A shelf that is technically level can often look like it’s “on the piss” due to these optical illusions.
We spent significant time “eyeballing” the placement to ensure it was visually pleasing, even if that meant deviating slightly from strict technical lines. This is a crucial step often overlooked in boat interior projects.
2. Cutting the Composite Panels: Choosing the Right Blade
For this project, we used composite panels with a PVC core. Cutting these materials requires the right technique to avoid melting the core or damaging the outer skin.
We opted for a jigsaw with a specialized blade. For composite materials like carbon fibre or fibreglass, you have two excellent options:
- Diamond-coated blades: Ideal for solid, monolithic materials like solid carbon or glass.
- Serrated (tooty) blades: These are specifically designed for composites and can also handle wood if needed, though they will blunt faster.
The right blade gives a clean cut without fraying or heat damage.
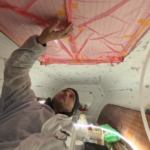
3. Dry-Fitting, Scribing, and Embracing Imperfections
Once cut, the first dry fit revealed gaps—as it almost always does. The beauty of working with composites is the ease of fixing these imperfections. Small gaps can be filled with foam and then seamlessly glassed over with tape, creating a strong, monolithic structure later.
4. The Game-Changer: Pre-Assembly and Pre-Painting
A major time-saving trick we employed was building and finishing the shelf as much as possible before installing it in the boat.
We glued the panels together on the bench, creating a stable unit. Then, we primed and painted all the surfaces that would be hard to reach once installed inside the cupboard. We only left the edges bare for the final fibreglass taping.
This approach saves countless hours of awkward sanding and painting in a tight corner. The final unit, primed and ready, weighed just 1.55kg.
5. Final Installation and Taping
With the shelf pre-finished, installing it was straightforward. We glued it into place and then taped the joints to the boat’s structure. To ensure a smooth finish that would require minimal fairing, we used peel ply on the wet fibreglass tape. Peel ply leaves a perfectly prepared surface that just needs a light sanding before painting, eliminating messy and time-consuming lump removal.
The Finished Result: Functional, Lightweight, and Integrated
The finished shelf provides perfect storage for books and drink bottles at the end of a bunk. It’s not just a add-on; it’s fully integrated into the boat, adding a touch of structural rigidity while being incredibly lightweight. By painting it white, it blends seamlessly into the cabin, looking like it was always meant to be there.
Key Takeaways for Your Project
- Trust Your Eyes: Sometimes, what looks right is more important than what is technically perfect in a boat’s complex interior.
- Invest in the Right Blades: A quality, appropriate jigsaw blade is essential for clean composite cuts.
- Work Off-Site When Possible: Pre-assembling and pre-finishing components on a bench is far easier and faster than working in situ.
- Use Peel Ply: This simple material is a game-changer for achieving professional, low-effort finishes on fibreglass tape.
This project proves that with some planning and composite know-how, you can add significant functionality to your boat without the weight penalty.
What’s Next? Custom Composite Hatches!
In our next project, we’re solving one of the most common problems on a boat: keeping the water out. We’re designing and building our own custom composite hatches! We’ll dive deep into the design process, including a mysterious hole feature born from years of liveaboard experience. Stay tuned!
Did you find this video helpful? We have more in-depth resources available on our members site, including detailed guides on selecting jigsaw blades for composite work and sharpening scissors for clean cuts. Visit www.youngbarnacles.com to continue learning!
- Boat Hatch Build: Installing Lenses & Drains for a Watertight Finish
 Key Topic: After months of building custom composite hatches, we reach the transformative stage: making them watertight and bringing in light. This hands-on guide walks you through our exact process of installing thick acrylic lenses, designing effective 3D-printed drainage, and using the right sealant for a perfect, professional bond. See the step-by-step techniques that turn… Read more: Boat Hatch Build: Installing Lenses & Drains for a Watertight Finish
 - The Professional’s Approach: Replacing a Problematic Hatch with a Proven Structural PortlightTopic Overview: We permanently eliminate a chronic leak point and increase deck panel strength by removing a problematic overhead hatch and glassing in a solid, camber-matched core. In its place, we install a robust, under-gunwale structural portlight—applying proven marine engineering for a drier, stiffer, and more reliable cabin. Author: Shayne and Anna The Problem: When a… Read more: The Professional’s Approach: Replacing a Problematic Hatch with a Proven Structural Portlight
- Hull Weight Reduction & Flush Hatch Installation: Paikea Refit UpdateKey Message: Significant weight reduction is not just about going faster; it’s about returning a performance multihull to its designed potential, which requires a systematic, professional approach to refitting. Author: Anna and Shayne Introduction This refit update marks a turning point on Project Paikea. After years of incremental work, we are now executing a coordinated push to… Read more: Hull Weight Reduction & Flush Hatch Installation: Paikea Refit Update
- Professional Hatch Installation: Solving Leaks with Precision EngineeringKey Message: This post documents two distinct professional upgrades on our Catana 42 refit: the precise installation of custom composite deck hatches and the full conversion of leaky portlights to watertight, outward-opening hatches. The first section covers the use of 3D-printed jigs for perfect deck hatch alignment, while the second details the engineering behind designing… Read more: Professional Hatch Installation: Solving Leaks with Precision Engineering
- Building Composite Hatches Using 3D Printed MoldsKey Message: Precise, Accessible Fabrication with 3D Printed ToolingBuilding custom composite hatches requires tooling that can accurately capture complex geometry. This project demonstrates a practical approach: using 3D printed molds for both the hatch lid and its frame. This method allows for precise, repeatable fabrication of composite parts with seal gutters and complex profiles, bridging… Read more: Building Composite Hatches Using 3D Printed Molds