Key Message: Mounting hardware to a carbon fibre structure requires a method that ensures both ultimate strength and long-term serviceability. For our Spectra watermaker installation, this meant bonding custom carbon plates to the bulkhead and using threaded inserts—specifically, thread certs—to create a robust, removable mount without drilling into the primary laminate. This approach, which we break down by comparing it to direct tapping and Helicoils, represents the professional standard for securing serviceable components to composites, ensuring they can be removed and reinstalled without compromising the structure.
Author: Shayne and Anna
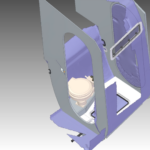
Mounting serious hardware like a Spectra watermaker to a carbon fibre structure requires more than just drilling and tapping a hole. The goal is a connection that is not only incredibly strong but also serviceable and reliable for the life of the boat. For the installation of our Clark pump, we needed a method that would allow for removal without wearing out the threads in the carbon itself.
Our solution involved bonding custom carbon plates to the bulkhead and then installing threaded inserts, completely avoiding drilling through the primary laminate. This approach demonstrates the modern, professional standard for bolting into composites.
The Core Challenge: Metal, Carbon, and Thread Longevity
The primary issue is the interaction between metal fasteners and the carbon composite. While stainless steel can cause minor galvanic corrosion (typically just rust staining) in the presence of moisture, the bigger concern for a mounted component is thread wear. A bolt repeatedly screwed into a directly-tapped carbon thread will eventually wear it out, leading to a weak, unreliable connection.
The Three Methods for Threading Composites
We systematically compared the three main techniques, each with its own place in a boatbuilder’s toolkit:
- Direct Tapping: Tapping a thread straight into the carbon.
- Best for: Permanent installations where the bolt will rarely, if ever, be removed (e.g., a swim ladder). It requires a thread depth of at least 1.5 times the bolt diameter for sufficient strength.
- Helicoils: A stainless steel wire coil inserted into a pre-tapped hole.
- Pros: Excellent for thread repair and easier to find than specialized inserts.
- Cons: Offers less of an increase in bearing area than a solid insert and can be tricky to install without “jumping” a thread and ruining the installation.
- Threaded Inserts (“Thread Certs”): Solid stainless steel sleeves with an internal and external thread.
- Pros: This is our preferred method for serviceable components. They provide the greatest increase in bearing area, effectively turning a small bolt into a larger one from the carbon’s perspective. The metal-on-metal thread is far more durable for repeated assembly and disassembly.
- Cons: Can be harder to source and require careful installation to prevent galling (the cold-welding of the stainless steel during installation).
Key Installation Takeaway: Preventing Galling
A critical lesson from our installation is the need to prevent galling when installing stainless steel thread certs. Using a low-speed drill and a liberal application of anti-seize lubricant like Tef-Gel on the installer tool is non-negotiable. Without it, the friction can cause the threads to weld themselves together, shearing the insert and ruining the tool—a mistake we demonstrate and rectify in the video.
The Finished, Professional Result
By bonding plates and using thread certs, we achieved a robust mounting solution for the Spectra watermaker that is:
- Structurally Sound: The load is distributed over a large glued area.
- Serviceable: The pump can be easily unbolted for maintenance.
- Non-Invasive: The primary structural bulkhead remains untouched, with no holes drilled through it.
This method is applicable to any deck hardware, mast fittings, or system components that require a strong, reliable mount on a composite structure.
Want to See More?
Immerse yourself in our Working With Composites videos covering all of our project upgrades on Paikea.
- Solving Boat Shower Drainage with Cardboard, CAD, 3D Scanning & 3D Printing
 The Hybrid Design Workflow: Building a Boat Shower Floor with Cardboard, CAD, and 3D Scanning: Walk through the hybrid design process for a custom boat shower floor. See how cardboard prototyping, CAD, 3D scanning, and 3D printing combine to solve complex drainage and access problems in a marine refit. Author: Shayne and Anna Introduction Designing… Read more: Solving Boat Shower Drainage with Cardboard, CAD, 3D Scanning & 3D Printing
 - Hull Weight Reduction & Flush Hatch Installation: Paikea Refit UpdateKey Message: Significant weight reduction is not just about going faster; it’s about returning a performance multihull to its designed potential, which requires a systematic, professional approach to refitting. Author: Anna and Shayne Introduction This refit update marks a turning point on Project Paikea. After years of incremental work, we are now executing a coordinated push to… Read more: Hull Weight Reduction & Flush Hatch Installation: Paikea Refit Update
- Professional Hatch Installation: Solving Leaks with Precision EngineeringKey Message: This post documents two distinct professional upgrades on our Catana 42 refit: the precise installation of custom composite deck hatches and the full conversion of leaky portlights to watertight, outward-opening hatches. The first section covers the use of 3D-printed jigs for perfect deck hatch alignment, while the second details the engineering behind designing… Read more: Professional Hatch Installation: Solving Leaks with Precision Engineering
- Building Composite Hatches Using 3D Printed MoldsKey Message: Precise, Accessible Fabrication with 3D Printed ToolingBuilding custom composite hatches requires tooling that can accurately capture complex geometry. This project demonstrates a practical approach: using 3D printed molds for both the hatch lid and its frame. This method allows for precise, repeatable fabrication of composite parts with seal gutters and complex profiles, bridging… Read more: Building Composite Hatches Using 3D Printed Molds
- Engineering Custom Composite Hatches: A Systematic ApproachTopic: A detailed breakdown of the design and engineering process for creating custom composite deck hatches, covering problem analysis, material selection, structural integration, and the use of 3D printing for prototyping and manufacturing. Author: Shayne and Anna The original deck hatches on our Catana 42, Paikea, had served for over three decades. While built to last, their design… Read more: Engineering Custom Composite Hatches: A Systematic Approach

Master Marine Composites
This installation is a sample of the practical, professional-grade content we create. In the Youngbarnacles Members Hub, you get immediate access to our entire library of deep-dive videos—like the full Gunboat 68 series on deck hardware and systems—where we explore the real-world engineering behind the projects. It’s our growing archive of advanced knowledge, without the fluff.
Become a Member today to explore our video library and join the community.